PSIRA / NBCPSS
The Private Security Industry Regulatory Authority (PSIRA) was established in terms of the Private Security Regulation Act to regulate and control the private security industry. The wages, allowances, and working conditions for the sector are set separately by the National Bargaining Council for the Private Security Sector (NBCPSS), through its Main Collective Agreement (MCA).
The following is an example of a contract pricing structure for the sector:
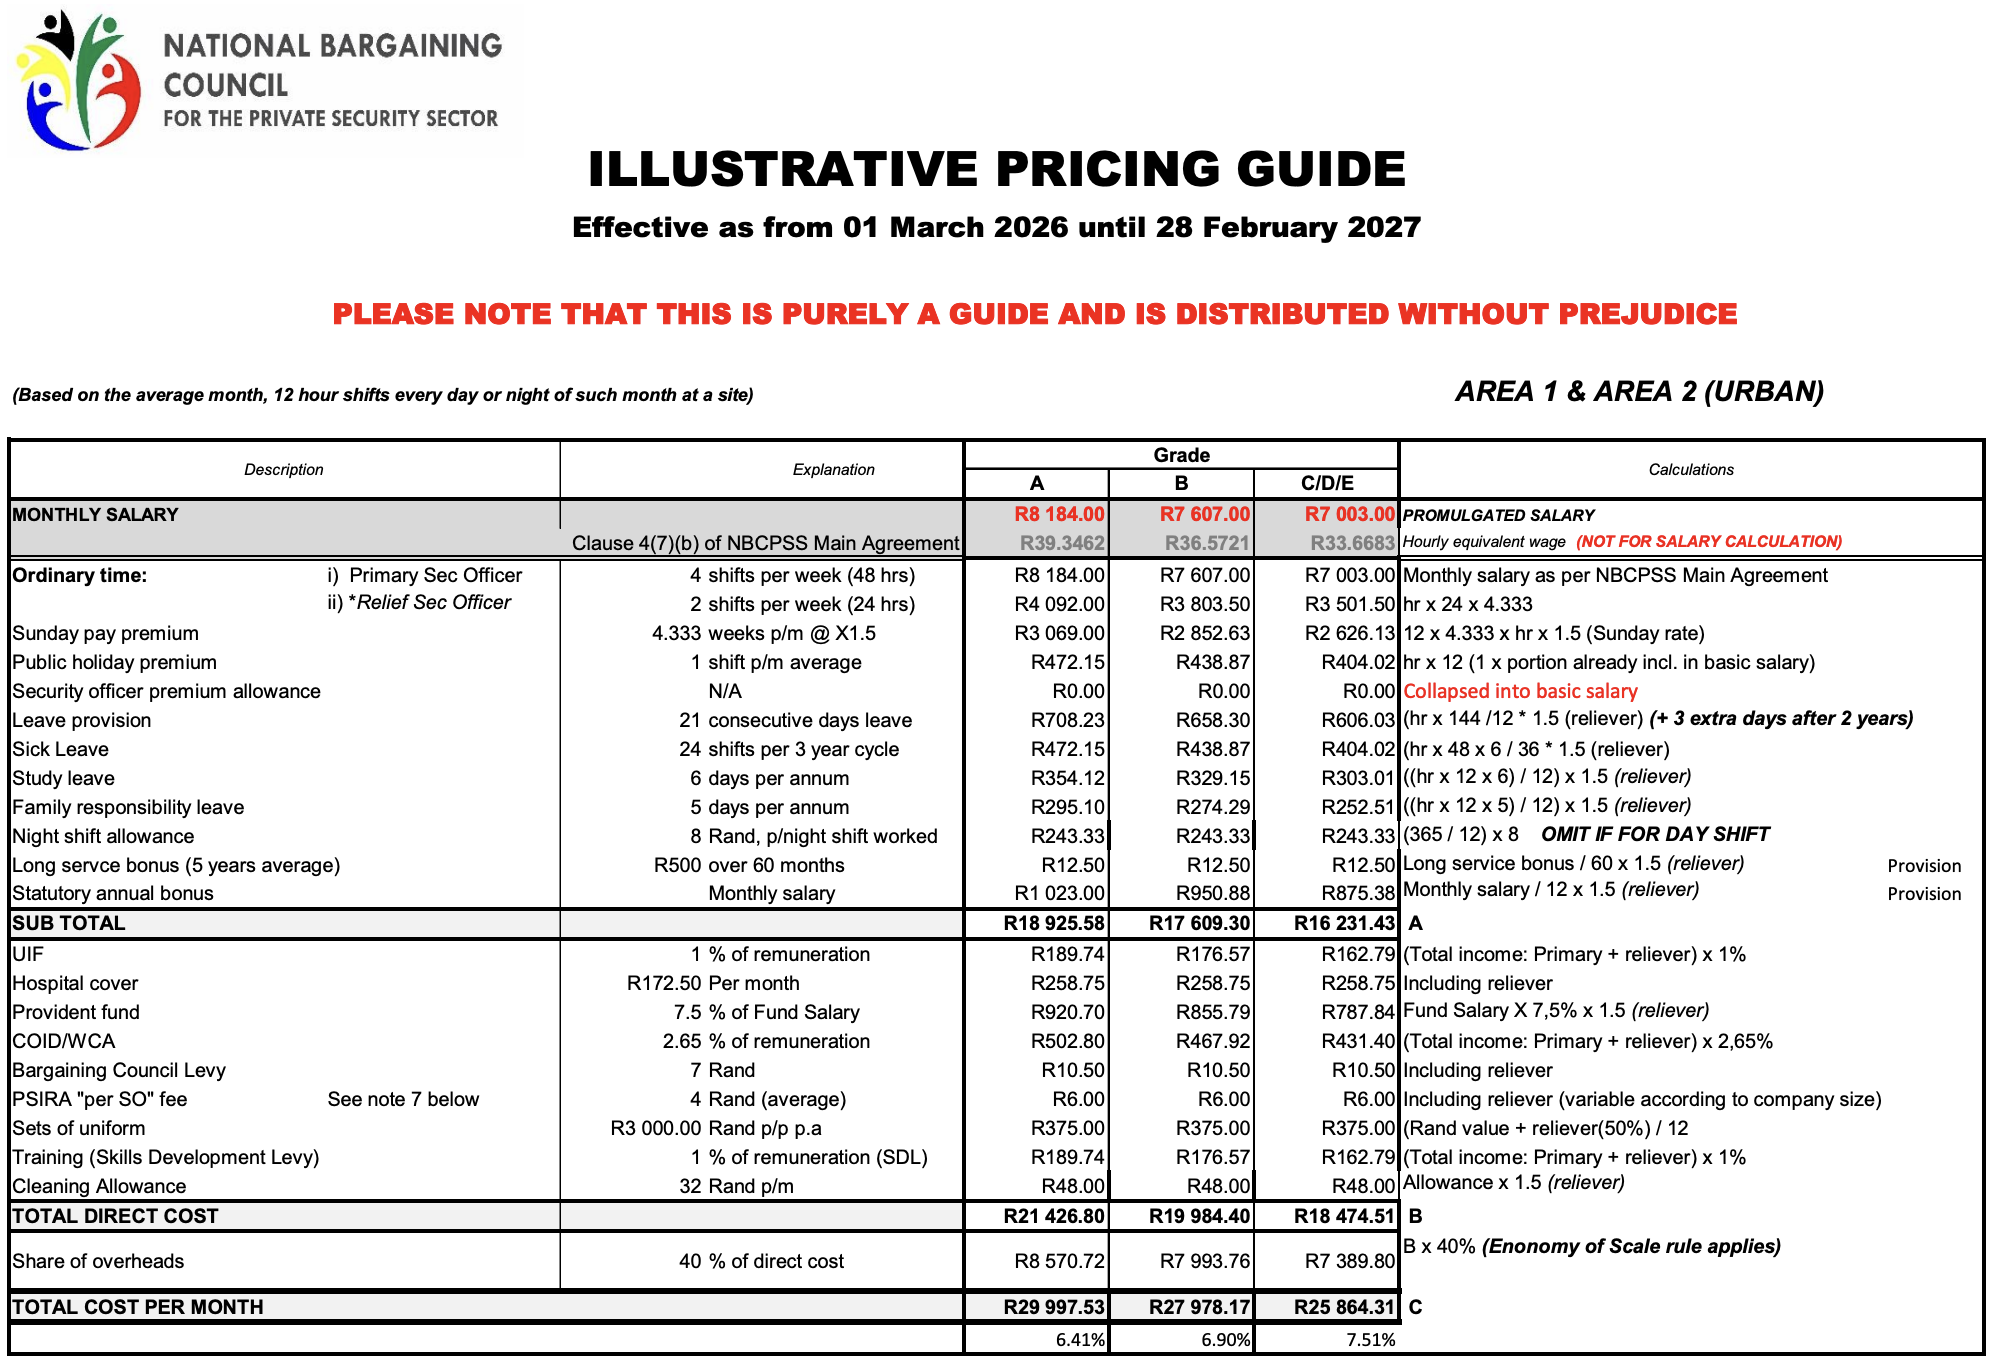
Example figures only
The figures in the screenshot above are the 2026–27 Private Security Sector rates for Areas 1 and 2, as provided by the NBCPSS. If you fall under Area 3, your figures may differ. We've used these figures throughout this guide to walk you through how to add the payroll items. When setting up your own payroll items, always use the amounts and percentages from your specific contract pricing structure.
The next part explains how to use a template (and job grades) to set up a Private Security Sector pricing structure in four steps.
Relevance of calculations
The amounts and percentages used below are for normal employees in job grades A–E. If you need to pay an employee who is acting as a "reliever", you need to set up a separate template for them. See Templates for more information.
Step 1: Create a Template
Create a Template, and continue with the setup below.
Step 2: Add Template Items
In your template, add the items from your contract pricing structure. Some items are system items, and others you'll need to add as template-only items.
Basic Salary (system item)
- Click Add under Normal Items.
- Click Basic Salary under Income.
- Leave the Hourly Rate field blank.
- Tick the Don't auto-pay public holidays and Enable input of number of shifts boxes.
- In the Sunday Pay section, tick the Override Sunday Pay Rates box.
- Leave the Normally works (default: 1.5x) and Normally off (default: 2.0x) fields at their default values.
- Click Save.
Provident Fund (system item)
- Click Add under Normal Items.
- Click Provident Fund under Deduction.
- Select "Fixed amount" in the Contribution Calculation drop-down.
- Enter: "= normal_rate * 208 * 0.075" in both the Fixed Contribution by Employee and Fixed Contribution by Employer fields.
- The normal_rate variable will use the employee's hourly rate.
- The 208 = 48 (hours per week) × 4.3333 (average number of weeks in a month).
- The 0.075 comes from the 7.5% in the Explanation column, in the Provident Fund row in the screenshot.
- Optional:
- Select a Beneficiary if you've already set them up. See Beneficiaries for more information.
- Leave the Category Factor field blank if the fund is not a Defined Benefit (DB) or hybrid fund.
- Click Save.
Setting up RFI (Retirement-funding income)
If you haven't set up how employees' RFI should be determined, the provident fund contributions will not be calculated on their payslips. See the Retirement Funds help page for more information.
To set up RFI
- Click Add under Normal Items.
- Click Retirement-funding income under Other.
- Select "All Income / Allowances / Benefits" in the RFI Determination drop-down.
- Click Save.
Health Insurance (custom benefit and custom deduction)
As per the MCA, the employer pays over the full amount (R 295), and recovers R 122.50 from the employee via a custom deduction. The remaining R 172.50 is recorded as a custom benefit. (This item is shown as Hospital cover in the screenshot.)
Add the custom benefit
- Click Add under Template-Only Items.
- Click Benefit.
- Enter "Health Insurance – Employer" as the Name.
- Select "Fixed amount" as the Input Type.
- Enter "R 172.50" as the Amount.
- Tick the relevant boxes:
- Click Save.
Add the custom deduction
- Click Add under Template-Only Items.
- Click Deduction.
- Enter "Health Insurance – Employee" as the Name.
- Select "Fixed amount" as the Input Type.
- Enter "R 122.50" as the Amount.
- Tick the BCEA deduction (Do not deduct from ETI Remuneration) box, if relevant. See the Calculating ETI help page for more information.
- Click Save.
Regular Hours (system item)
- Click Add under Normal Items.
- Click Regular Hours under Other.
- Enter "12" in the Hours per day field.
- Leave the Schedule as "Fixed".
- Tick all seven days of the week.
- Click Override next to Full days per week, and enter "5".
- Click Save.
Consecutive leave days
If an employee takes leave for 15 consecutive working days, they will have 21 consecutive calendar days off (because there are weekends in between).
Night Shift Allowance (custom allowance)
If you have not previously created a custom item for this, add a template-only allowance item as follows:
- Click Add under Template-Only Items.
- Click Allowance.
- Enter "Night Shift Allowance" as the Name.
- Select "Custom rate * quantity" as the Input Type.
- Enter "0" as the Hours worked factor.
- Enter "8" in the Custom rate field.
- Tick the relevant boxes:
- Affects Wage for ETI Purposes: If this allowance should be included as part of their Qualifying Wage for ETI purposes.
- Include in Cost to Company Calculation: If this allowance should be included in the Cost to Company report.
- Click Save.
Cleaning Allowance (custom allowance)
- Click Add under Template-Only Items.
- Click Allowance.
- Enter "Cleaning Allowance" as the Name.
- Select "Fixed Amount" as the Input Type.
- Enter "32" as the Amount.
- Tick the Affects Wage for ETI Purposes and Include in Cost to Company Calculation boxes, if relevant. (See Night Shift Allowance for more details.)
- Click Save.
Security Officer Premium Allowance (custom allowance)
If your contract pricing structure shows this allowance as collapsed into basic salary (as in the example table), you don't need to add a separate item.
If your contract pricing structure shows a separate amount, add it as an allowance:
- Click Add under Template-Only Items.
- Click Allowance.
- Enter "Security Officer Premium Allowance" as the Name.
- Select "Fixed amount" as the Input Type.
- Enter the Amount (consult your pricing structure).
- Tick the Affects Wage for ETI Purposes and Include in Cost to Company Calculation boxes, if relevant. (See Night Shift Allowance for more details.)
- Click Save.
Bargaining Council Levy (custom deduction and custom benefit)
The Bargaining Council Levy is a matched contribution: the same amount is deducted from the employee and contributed by the employer, and paid over to the Bargaining Council each month.
Use the current levy amount
The levy amount changes over time (for example, through the annual amending agreements). Rather than entering a fixed value from this guide, always use the current levy amount from your own pricing structure.
Add the custom deduction
- Click Add under Template-Only Items.
- Click Deduction.
- Enter "Bargaining Council Levy – Employee" as the Name.
- Select "Enter Amount Per Employee" as the Input Type.
- Tick the relevant boxes:
- Enable Pro-Rata
- BCEA deduction (Do not deduct from ETI Remuneration). See the Calculating ETI help page for more information.
- Click Save.
Add the custom benefit
- Click Add under Template-Only Items.
- Click Benefit.
- Enter "Bargaining Council Levy – Employer" as the Name.
- Select "Enter Amount Per Employee" as the Input Type.
- Use the same amount as the employee deduction.
- Tick these boxes, if relevant (see Health Insurance for details on each):
- Enable Pro-Rata
- Exclude from Accounting
- Bargaining Council Item
- Include in Cost to Company Calculation
- Click Save.
Entering the amount per employee
Adding the deduction and benefit only creates the templates. To enter the individual employees' amounts in bulk:
- Go to Employees > Bulk Actions > Regular Inputs (under Payroll Inputs).
- Select "Bargaining Council Levy – Employee" (under Deduction) from the drop-down.
- Complete the Amount column.
- Click Save.
This process can then be repeated for the employer's portion, selecting "Bargaining Council Levy – Employer" (under Benefit) instead.
See Bulk Inputs for more on entering information this way.
PSIRA Fee (custom deduction)
The PSIRA "per SO" fee is deducted from the employee each month; the employer then facilitates payment over to PSIRA.
- Click Add under Template-Only Items.
- Click Deduction.
- Enter "PSIRA Fee" as the Name.
- Select "Enter Amount Per Employee" as the Input Type.
- Tick the Enable Pro-Rata and BCEA deduction (Do not deduct from ETI Remuneration) boxes, if relevant. (See the Bargaining Council Levy deduction for more details.)
- Click Save.
Once your template is ready, you can decide which template items are applicable and to which employees it should be added. (See Templates for more information.)
Entering the amount per employee
Adding the deduction only creates the template. To enter the individual employees' amounts in bulk:
- Go to Employees > Bulk Actions > Regular Inputs (under Payroll Inputs).
- Select "PSIRA Fee" (under Deduction) from the drop-down.
- Complete the Amount column.
- Click Save.
See Bulk Inputs for more on entering information this way.
Step 3: Set Up Job Grades
If your pricing structure specifies different hourly rates by job grade (for example, A–E), set up job grades so that each employee's Basic Salary is calculated correctly:
- Go to Settings > Job Grades > Add Job Grade.
- Enter "PSIRA Grade A" as the Name.
- Enter "39.3462" as the Fixed normal rate.
- Click Save.
This process can then be repeated for the other job grades, with changes to the Name and Fixed normal rate:
- PSIRA Grade B: 36.5721 – which is 7,607 ÷ 208
- PSIRA Grade C/D/E: 33.6683 – which is 7,003 ÷ 208
Differences between areas
Keep area differences in mind. For example, some areas might have premiums, while others don't. Hourly rates may also differ by area.
Step 4: Add Employees to Templates
You can now add templates to your employees. Click here for more information.